Chestnut craft ideas? Find out super cute DIY fall decoration projects for young and old!
Chestnuts are not only suited for roasting on an open fire, but also as a decoration in the drop and winter months. These warm, chocolate coloured gems will insert some woodland attraction to your home. Not only do they provide an natural and organic, all-natural experience, but they are also regarded to preserve spiders and moths absent! There are so many different chestnut craft ideas! You can buy chestnuts in most supermarkets, but if you want an genuine truly feel you can select them you! And what can you make from chestnuts? Make sure you browse on!
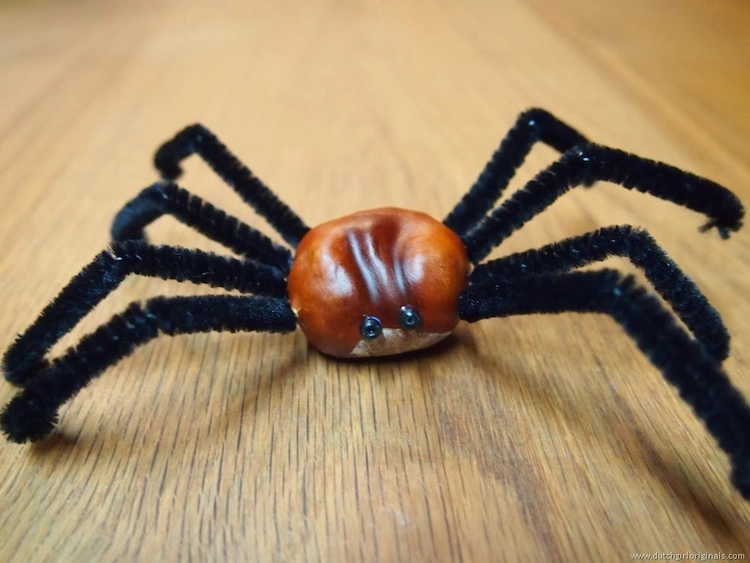
Diy Chestnut spiders – enjoyment crafts for youngsters
Ads
Supplies desired:
Of course you can also make these spiders with sticks or toothpicks, which you break in the center to variety the legs.

Advertisements
Guidance:
- Slice the pipe cleaners into 8 parts. You can slash them in fifty percent and then minimize them in 50 percent once again.
- Make 8 holes for the legs and glue the pipe cleaners in. Make sure the holes are deep plenty of so they have anything to “hold onto”.
- Scratch the shiny floor of the chestnut to enable the eye glue stick and insert the googly eyes.
Chestnut craft ideas – Diy tumble wreath

Resources and tools desired:
- 100+ chestnuts (picked or retail store purchased)
- Wreath foundation (you can make your very own wreath foundation or invest in a single at the grocery store)
- Incredibly hot glue gun (You will want 10 glue sticks for this undertaking)
- Tape to attach the wreath to a doorway or wall

Do-it-yourself Chestnut wreath stage-by-phase guidance:
- Collect all the components and plug in the sizzling glue gun to make guaranteed it is heated up just before starting the challenge.
- Wash and dry all the chestnuts. This is vital to assure that any dust is taken off.
- Tie the major ribbon (if your wreath foundation does not previously have one).
- Place a dab of scorching glue on 1 chestnut (the flat aspect is best) and push it into the wreath base. Keep the chestnut for a few seconds to make positive it stays in place.
- Glue the chestnuts to the major and sides of the wreath base, the again stays absolutely free. This way the wreath is simple to hold and there is no danger of the wreath slipping apart. Repeat the process for every single chestnut (only 1 at a time) until eventually you have included the overall wreath with chestnuts.
- Let the glue to dry prior to attaching the bow. For the bow, get jute ribbon or a broad ribbon and make a significant bow. To connect the bow to the wreath, choose a long strip of ribbon and tie it all-around the heart of the bow, then tie the finishes of the ribbon all around the bottom (or top) of the wreath.
- Cling your new chestnut wreath and consider plenty of pictures!
Chestnut craft thoughts – How to make a heart

Components and tools essential:
- Chestnuts
- String or wire
- Scissors
- Hammer
- Extended nails
- Slicing board
Be sure to have an adult prick the chestnuts.
Directions:
- Insert the nail into the middle of the chestnut and hammer by means of right until the nail shows on the other aspect. Preserve undertaking this until all the chestnuts are pierced.
- If using wire, it is most effective to bend the steel into a coronary heart form.
- Thread the chestnuts just one by a single onto the organized wire sort.
- Dangle on the mantel or on the wall to include a loving touch to your house.
How to make a adorable garland from chestnuts?

Elements and instruments desired:
- Plastic fishing line
- New chestnuts
- Leather-based line
- Thin nail
- Hammer
- Substantial plastic needle
- Scissors
- Oven or foods dryer

Instructions:
- Use a hammer and nail to punch a gap in the heart of every chestnut. Some chestnuts are so soft that you can crush the shell with your fingers. Other individuals need a hammer to push the nail in.
- Immediately after generating the initial hole, insert the plastic needle into the hole and pull it out the other facet. The hole must be massive and free.
- Dry the chestnuts. If you have a dehydrator, established it to the most affordable environment and let it operate for at minimum 3 times. If you never have a dehydrator, set your oven to the lowest environment and dry the chestnuts on a baking sheet in the oven for 5-6 hours. The for a longer time you can leave them in the oven, the shorter the ultimate drying time. Take away the chestnuts from the oven and allow them air dry for 3-7 days. The chestnuts are rock hard when totally dried.

- At the time the chestnuts are dry and great, thread them onto the fishing line with the plastic needle.
- Slash the leather-based twine into 12 cm long parts. You need to have a piece for each individual chestnut, and an more piece.
- Starting at 1 stop of the garland, tie a piece of leather twine amongst each and every chestnut.
- Tie off the fishing line at each finishes. It is simplest to tie the fishing line by means of with the leather strip at each ends to maintain the knot safe.
- Wrap the garland close to the railing, or hold it on the wall or doorway and take pleasure in the fresh slide mood at residence!